Spring中的AOP
发布于2021-03-13 13:33 阅读(1434) 评论(0) 点赞(27) 收藏(2)
一、AOP相关术语
Joinpoint(连接点)
Pointcut(切入点)
Advice(通知/增强)

Introduction(引入)
Target(目标对象)
Weaving(织入)


二、Spring基于xml的AOP
功能实现:
模拟account账户增删改查,在不改变其源码的情况下使用AOP对其进行功能增强。以下以日志功能前置通知举例:
1.首先导入相关依赖包
aspectj坐标用于
  <packaging>jar</packaging>

    <dependencies>
        <dependency>
            <groupId>org.springframework</groupId>
            <artifactId>spring-context</artifactId>
            <version>5.0.2.RELEASE</version>
        </dependency>

        <dependency>
            <groupId>org.aspectj</groupId>
            <artifactId>aspectjweaver</artifactId>
            <version>1.8.7</version>
        </dependency>
    </dependencies>
在src/main/com/itheima/service包中创建
IAccountService.interface
package com.itheima.service;

/**
 * 账户的业务层接口
 */
public interface IAccountService {

    /**
     * 模拟保存账户
     */
   void saveAccount();

    /**
     * 模拟更新账户
     * @param i
     */
   void updateAccount(int i);

    /**
     * 删除账户
     * @return
     */
   int  deleteAccount();
}
service/impl包中创建
AccountServiceImpl.java,实现接口
package com.itheima.service.impl;

import com.itheima.service.IAccountService;

/**
 * 账户的业务层实现类
 */
public class AccountServiceImpl implements IAccountService{

    @Override
    public void saveAccount() {
        System.out.println("执行了保存");
    }

    @Override
    public void updateAccount(int i) {
        System.out.println("执行了更新"+i);

    }

    @Override
    public int deleteAccount() {
        System.out.println("执行了删除");
        return 0;
    }
}
基本的增删改查代码如上
接下来要实现的是在调用saveAccount()方法前使用xml AOP的方式打印日志信息。
在com/itheima/utils包中创建
Logger.java
package com.itheima.utils;

/**
 * 用于记录日志的工具类,它里面提供了公共的代码
 */
public class Logger {

    /**
     * 用于打印日志:计划让其在切入点方法执行之前执行(切入点方法就是业务层方法)
     */
    public  void printLog(){
        System.out.println("Logger类中的pringLog方法开始记录日志了。。。");
    }
}
bean.xml中首先进行AccountServiceImpl的IOC配置
导入xmlns:aop以实现AOP功能
首先导入约束
<?xml version="1.0" encoding="UTF-8"?>
<beans xmlns="http://www.springframework.org/schema/beans"
       xmlns:xsi="http://www.w3.org/2001/XMLSchema-instance"
       xmlns:aop="http://www.springframework.org/schema/aop"
       xsi:schemaLocation="http://www.springframework.org/schema/beans
        http://www.springframework.org/schema/beans/spring-beans.xsd
        http://www.springframework.org/schema/aop
        http://www.springframework.org/schema/aop/spring-aop.xsd">
</beans>
完整的代码:
<?xml version="1.0" encoding="UTF-8"?>
<beans xmlns="http://www.springframework.org/schema/beans"
       xmlns:xsi="http://www.w3.org/2001/XMLSchema-instance"
       xmlns:aop="http://www.springframework.org/schema/aop"
       xsi:schemaLocation="http://www.springframework.org/schema/beans
        http://www.springframework.org/schema/beans/spring-beans.xsd
        http://www.springframework.org/schema/aop
        http://www.springframework.org/schema/aop/spring-aop.xsd">

    <!-- 配置srping的Ioc,把service对象配置进来-->
    <bean id="accountService" class="com.itheima.service.impl.AccountServiceImpl"></bean>

    <!--spring中基于XML的AOP配置步骤
        1、把通知Bean也交给spring来管理
        2、使用aop:config标签表明开始AOP的配置
        3、使用aop:aspect标签表明配置切面
                id属性:是给切面提供一个唯一标识
                ref属性:是指定通知类bean的Id。
        4、在aop:aspect标签的内部使用对应标签来配置通知的类型
               我们现在示例是让printLog方法在切入点方法执行之前之前:所以是前置通知
               aop:before:表示配置前置通知
                    method属性:用于指定Logger类中哪个方法是前置通知
                    pointcut属性:用于指定切入点表达式,该表达式的含义指的是对业务层中哪些方法增强

            切入点表达式的写法:
                关键字:execution(表达式)
                表达式:
                    访问修饰符  返回值  包名.包名.包名...类名.方法名(参数列表)
                标准的表达式写法:
                    public void com.itheima.service.impl.AccountServiceImpl.saveAccount()
                访问修饰符可以省略
                    void com.itheima.service.impl.AccountServiceImpl.saveAccount()
                返回值可以使用通配符,表示任意返回值
                    * com.itheima.service.impl.AccountServiceImpl.saveAccount()
                包名可以使用通配符,表示任意包。但是有几级包,就需要写几个*.
                    * *.*.*.*.AccountServiceImpl.saveAccount())
                包名可以使用..表示当前包及其子包
                    * *..AccountServiceImpl.saveAccount()
                类名和方法名都可以使用*来实现通配
                    * *..*.*()
                参数列表:
                    可以直接写数据类型:
                        基本类型直接写名称           int
                        引用类型写包名.类名的方式   java.lang.String
                    可以使用通配符表示任意类型,但是必须有参数
                    可以使用..表示有无参数均可,有参数可以是任意类型
                全通配写法:
                    * *..*.*(..)

                实际开发中切入点表达式的通常写法:
                    切到业务层实现类下的所有方法
                        * com.itheima.service.impl.*.*(..)
    -->

    <!-- 配置Logger类 -->
    <bean id="logger" class="com.itheima.utils.Logger"></bean>

    <!--配置AOP-->
    <aop:config>
        <!--配置切面 -->
        <aop:aspect id="logAdvice" ref="logger">
            <!-- 配置通知的类型,并且建立通知方法和切入点方法的关联-->
            <aop:before method="printLog" pointcut="execution(* com.itheima.service.impl.*.*(..))"></aop:before>
        </aop:aspect>
    </aop:config>

</beans>
在aop:before标签中,method属性对应aop:aspect ref引入类(即Logger)中的方法。
前置通知:aop:before
后置通知:aop:after-returning
异常通知:aop:after-throwing
最终通知:afterPrintLog
实现如下
Logger.java
    /**
     * 前置通知
     */
    public  void beforePrintLog(){
        System.out.println("前置通知Logger类中的beforePrintLog方法开始记录日志了。。。");
    }

    /**
     * 后置通知
     */
    public  void afterReturningPrintLog(){
        System.out.println("后置通知Logger类中的afterReturningPrintLog方法开始记录日志了。。。");
    }
    /**
     * 异常通知
     */
    public  void afterThrowingPrintLog(){
        System.out.println("异常通知Logger类中的afterThrowingPrintLog方法开始记录日志了。。。");
    }

    /**
     * 最终通知
     */
    public  void afterPrintLog(){
        System.out.println("最终通知Logger类中的afterPrintLog方法开始记录日志了。。。");
    }
bean.xml
<?xml version="1.0" encoding="UTF-8"?>
<beans xmlns="http://www.springframework.org/schema/beans"
       xmlns:xsi="http://www.w3.org/2001/XMLSchema-instance"
       xmlns:aop="http://www.springframework.org/schema/aop"
       xsi:schemaLocation="http://www.springframework.org/schema/beans
        http://www.springframework.org/schema/beans/spring-beans.xsd
        http://www.springframework.org/schema/aop
        http://www.springframework.org/schema/aop/spring-aop.xsd">

    <!-- 配置srping的Ioc,把service对象配置进来-->
    <bean id="accountService" class="com.itheima.service.impl.AccountServiceImpl"></bean>


    <!-- 配置Logger类 -->
    <bean id="logger" class="com.itheima.utils.Logger"></bean>

    <!--配置AOP-->
    <aop:config>
        <!-- 配置切入点表达式 id属性用于指定表达式的唯一标识。expression属性用于指定表达式内容
              此标签写在aop:aspect标签内部只能当前切面使用。
              它还可以写在aop:aspect外面,此时就变成了所有切面可用
          -->
        <aop:pointcut id="pt1" expression="execution(* com.itheima.service.impl.*.*(..))"></aop:pointcut>
        <!--配置切面 -->
        <aop:aspect id="logAdvice" ref="logger">
            <!-- 配置前置通知:在切入点方法执行之前执行
            <aop:before method="beforePrintLog" pointcut-ref="pt1" ></aop:before>-->

            <!-- 配置后置通知:在切入点方法正常执行之后值。它和异常通知永远只能执行一个
            <aop:after-returning method="afterReturningPrintLog" pointcut-ref="pt1"></aop:after-returning>-->

            <!-- 配置异常通知:在切入点方法执行产生异常之后执行。它和后置通知永远只能执行一个
            <aop:after-throwing method="afterThrowingPrintLog" pointcut-ref="pt1"></aop:after-throwing>-->

            <!-- 配置最终通知:无论切入点方法是否正常执行它都会在其后面执行
            <aop:after method="afterPrintLog" pointcut-ref="pt1"></aop:after>-->

            <!-- 配置环绕通知 详细的注释请看Logger类中-->
            <aop:around method="aroundPringLog" pointcut-ref="pt1"></aop:around>
        </aop:aspect>
    </aop:config>

</beans>
可以看到,通过配置aop:pointcut标签可配置切入点表达式,通知标签属性需改为:pointcut-ref
<aop:pointcut id="pt1" expression="execution(* com.itheima.service.impl.*.*(..))"></aop:pointcut>
注意:后置通知和异常通知互斥,只有一个能执行。
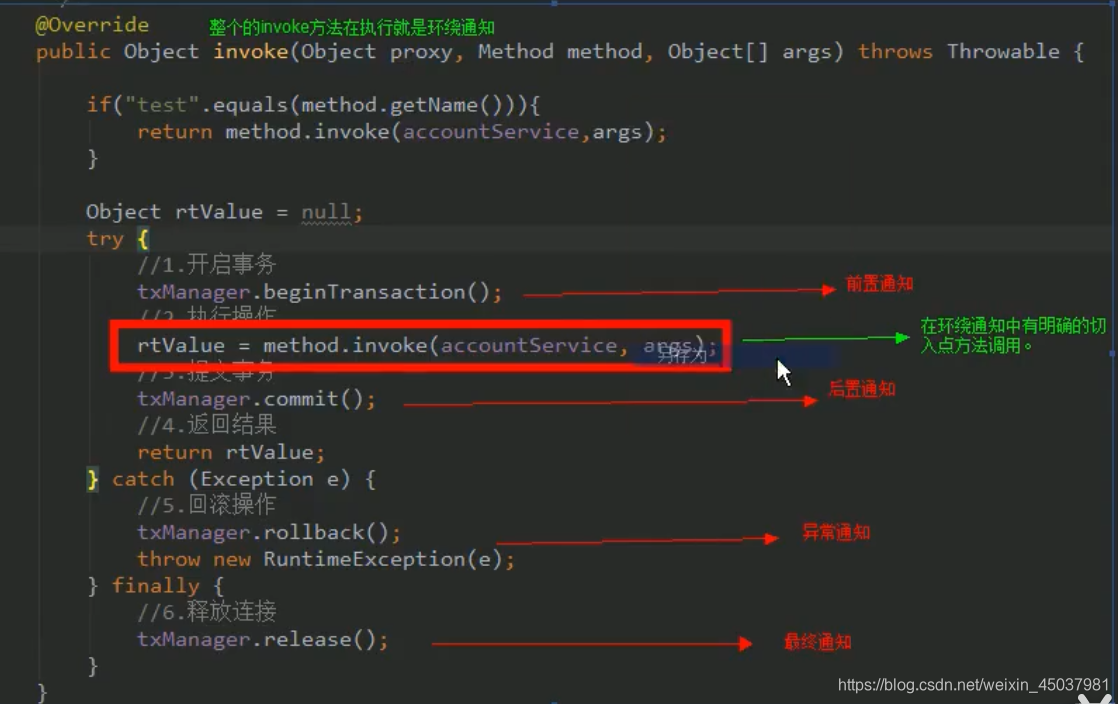
环绕通知
Logger.java
  /**
     * 环绕通知
     * 问题:
     *      当我们配置了环绕通知之后,切入点方法没有执行,而通知方法执行了。
     * 分析:
     *      通过对比动态代理中的环绕通知代码,发现动态代理的环绕通知有明确的切入点方法调用,而我们的代码中没有。
     * 解决:
     *      Spring框架为我们提供了一个接口:ProceedingJoinPoint。该接口有一个方法proceed(),此方法就相当于明确调用切入点方法。
     *      该接口可以作为环绕通知的方法参数,在程序执行时,spring框架会为我们提供该接口的实现类供我们使用。
     *
     * spring中的环绕通知:
     *      它是spring框架为我们提供的一种可以在代码中手动控制增强方法何时执行的方式。
     */
    public Object aroundPringLog(ProceedingJoinPoint pjp){
        Object rtValue = null;
        try{
            Object[] args = pjp.getArgs();//得到方法执行所需的参数

            System.out.println("Logger类中的aroundPringLog方法开始记录日志了。。。前置");

            rtValue = pjp.proceed(args);//明确调用业务层方法(切入点方法)

            System.out.println("Logger类中的aroundPringLog方法开始记录日志了。。。后置");

            return rtValue;
        }catch (Throwable t){
            System.out.println("Logger类中的aroundPringLog方法开始记录日志了。。。异常");
            throw new RuntimeException(t);
        }finally {
            System.out.println("Logger类中的aroundPringLog方法开始记录日志了。。。最终");
        }
    }
实现类
AOPTest
package com.itheima.test;

import com.itheima.service.IAccountService;
import org.springframework.context.ApplicationContext;
import org.springframework.context.support.ClassPathXmlApplicationContext;

/**
 * 测试AOP的配置
 */
public class AOPTest {

    public static void main(String[] args) {
        //1.获取容器
        ApplicationContext ac = new ClassPathXmlApplicationContext("bean.xml");
        //2.获取对象
        IAccountService as = (IAccountService)ac.getBean("accountService");
        //3.执行方法
        as.saveAccount();
    }
}
三、spring中基于注解的AOP配置
AccountServiceImpl.java
package com.itheima.service.impl;

import com.itheima.service.IAccountService;
import org.springframework.stereotype.Service;

/**
 * 账户的业务层实现类
 */
@Service("accountService")
public class AccountServiceImpl implements IAccountService{

    @Override
    public void saveAccount() {
        System.out.println("执行了保存");
        int i=1/0;
    }

    @Override
    public void updateAccount(int i) {
        System.out.println("执行了更新"+i);

    }

    @Override
    public int deleteAccount() {
        System.out.println("执行了删除");
        return 0;
    }
}
Logger.java
package com.itheima.utils;

import org.aspectj.lang.ProceedingJoinPoint;
import org.aspectj.lang.annotation.*;
import org.springframework.stereotype.Component;

/**
 * 用于记录日志的工具类,它里面提供了公共的代码
 */
@Component("logger")
@Aspect//表示当前类是一个切面类
public class Logger {

    @Pointcut("execution(* com.itheima.service.impl.*.*(..))")
    private void pt1(){}

    /**
     * 前置通知
     */
//    @Before("pt1()")
    public  void beforePrintLog(){
        System.out.println("前置通知Logger类中的beforePrintLog方法开始记录日志了。。。");
    }

    /**
     * 后置通知
     */
//    @AfterReturning("pt1()")
    public  void afterReturningPrintLog(){
        System.out.println("后置通知Logger类中的afterReturningPrintLog方法开始记录日志了。。。");
    }
    /**
     * 异常通知
     */
//    @AfterThrowing("pt1()")
    public  void afterThrowingPrintLog(){
        System.out.println("异常通知Logger类中的afterThrowingPrintLog方法开始记录日志了。。。");
    }

    /**
     * 最终通知
     */
//    @After("pt1()")
    public  void afterPrintLog(){
        System.out.println("最终通知Logger类中的afterPrintLog方法开始记录日志了。。。");
    }

    /**
     * 环绕通知
     * 问题:
     *      当我们配置了环绕通知之后,切入点方法没有执行,而通知方法执行了。
     * 分析:
     *      通过对比动态代理中的环绕通知代码,发现动态代理的环绕通知有明确的切入点方法调用,而我们的代码中没有。
     * 解决:
     *      Spring框架为我们提供了一个接口:ProceedingJoinPoint。该接口有一个方法proceed(),此方法就相当于明确调用切入点方法。
     *      该接口可以作为环绕通知的方法参数,在程序执行时,spring框架会为我们提供该接口的实现类供我们使用。
     *
     * spring中的环绕通知:
     *      它是spring框架为我们提供的一种可以在代码中手动控制增强方法何时执行的方式。
     */
    @Around("pt1()")
    public Object aroundPringLog(ProceedingJoinPoint pjp){
        Object rtValue = null;
        try{
            Object[] args = pjp.getArgs();//得到方法执行所需的参数

            System.out.println("Logger类中的aroundPringLog方法开始记录日志了。。。前置");

            rtValue = pjp.proceed(args);//明确调用业务层方法(切入点方法)

            System.out.println("Logger类中的aroundPringLog方法开始记录日志了。。。后置");

            return rtValue;
        }catch (Throwable t){
            System.out.println("Logger类中的aroundPringLog方法开始记录日志了。。。异常");
            throw new RuntimeException(t);
        }finally {
            System.out.println("Logger类中的aroundPringLog方法开始记录日志了。。。最终");
        }
    }
}
bean.xml
<?xml version="1.0" encoding="UTF-8"?>
<beans xmlns="http://www.springframework.org/schema/beans"
       xmlns:xsi="http://www.w3.org/2001/XMLSchema-instance"
       xmlns:aop="http://www.springframework.org/schema/aop"
       xmlns:context="http://www.springframework.org/schema/context"
       xsi:schemaLocation="http://www.springframework.org/schema/beans
        http://www.springframework.org/schema/beans/spring-beans.xsd
        http://www.springframework.org/schema/aop
        http://www.springframework.org/schema/aop/spring-aop.xsd
        http://www.springframework.org/schema/context
        http://www.springframework.org/schema/context/spring-context.xsd">

    <!-- 配置spring创建容器时要扫描的包-->
    <context:component-scan base-package="com.itheima"></context:component-scan>

    <!-- 配置spring开启注解AOP的支持 -->
    <aop:aspectj-autoproxy></aop:aspectj-autoproxy>
</beans>
spring中基于注解的AOP配置,后置通知和异常通知可能会出现顺序不一致,原因是pom.xml的spirng低版本存在这样的bug,我们将依赖改为高版本spring即可
原文链接:https://blog.csdn.net/weixin_45037981/article/details/114652226
所属网站分类: 技术文章 > 博客
作者:天使的翅膀
链接:http://www.javaheidong.com/blog/article/114230/b1561505735cfdfeb810/
来源:java黑洞网
任何形式的转载都请注明出处,如有侵权 一经发现 必将追究其法律责任
昵称:
评论内容:(最多支持255个字符)
---无人问津也好,技不如人也罢,你都要试着安静下来,去做自己该做的事,而不是让内心的烦躁、焦虑,坏掉你本来就不多的热情和定力