Mybatis源码阅读(二)
发布于2020-12-03 06:05 阅读(1189) 评论(0) 点赞(4) 收藏(3)
本文主要介绍Java中,不使用XML和使用XML构建SqlSessionFactory,通过SqlSessionFactory 中获取SqlSession的方法,使用SqlsessionManager管理Sqlsession复用等等..以及相关的示例代码
SqlSession
SqlSessions 是由 SqlSessionFactory 实例创建的。SqlSessionFactory 对象包含创建 SqlSession 实例的各种方法。而 SqlSessionFactory 本身是由 SqlSessionFactoryBuilder 创建的,它可以从 XML、注解或 Java 配置代码来创建 SqlSessionFactory。
使用 MyBatis 的主要 Java 接口就是 SqlSession。你可以通过这个接口来执行命令,获取映射器示例和管理事务。在介绍 SqlSession 接口之前,我们先来了解如何获取一个 SqlSession 实例。
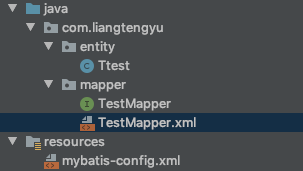
举个例子

public class Ttest {
    private Long id;
    private String context;
....
}
TestMapper.java
public interface TestMapper {
    Ttest getOne(Long id);
}
TestMapper.xml
<mapper namespace="com.liangtengyu.mapper.TestMapper">
    <select id="getOne" resultType="com.liangtengyu.entity.Ttest">
		select * from t_test where id  = #{id}
	</select>
</mapper>
mybatis-config.xml
<?xml version="1.0" encoding="UTF-8"?>
<!DOCTYPE configuration
        PUBLIC "-//mybatis.org//DTD Config 3.0//EN"
        "http://mybatis.org/dtd/mybatis-3-config.dtd">
<configuration>
    <!--开启日志输出-->
    <settings>
        <setting name="logImpl" value="STDOUT_LOGGING" />
    </settings>
    <!--配置类别名,配置后在Mapper配置文件(通常我们将编写SQL语句的配置文件成为Mapper配置文件)中需要使用pojo包中的类时,使用简单类名即可-->
    <typeAliases>
        <package name="com.liangtengyu.entity"/>
    </typeAliases>
    <environments default="development">
        <environment id="development">
            <transactionManager type="JDBC"></transactionManager>
            <dataSource type="POOLED">
                <property name="driver" value="com.mysql.jdbc.Driver"/>
                <property name="username" value="root"/>
                <property name="password" value="123456"/>
                <property name="url" value="jdbc:mysql://localhost:3306/test?characterEncoding=UTF-8"/>
            </dataSource>
        </environment>
    </environments>
    <mappers>
        <package name="com.liangtengyu.mapper"/>
    </mappers>

</configuration>
来个测试方法:
   @Test
    public void testMyBatisBuild() throws IOException {
        Reader reader = Resources.getResourceAsReader("mybatis-config.xml");
        SqlSessionFactory factory = new SqlSessionFactoryBuilder().build(reader);
        SqlSession sqlSession = factory.openSession();
        TestMapper mapper = sqlSession.getMapper(TestMapper.class);
        Ttest one = mapper.getOne(1L);
        System.out.println(one);
        sqlSession.close();
    }
运行测试方法,控制台打印日志:
Checking to see if class com.liangtengyu.mapper.TestMapper matches criteria [is assignable to Object]
Opening JDBC Connection
Created connection 2083117811.   //创建的连接名
Setting autocommit to false on JDBC Connection [com.mysql.jdbc.JDBC4Connection@7c29daf3]
==>  Preparing: select * from t_test where id = ?
==> Parameters: 1(Long)
<==    Columns: id, context
<==        Row: 1, 123


<==      Total: 1
Ttest{id=1, context='123'}
Resetting autocommit to true on JDBC Connection [com.mysql.jdbc.JDBC4Connection@7c29daf3]
Closing JDBC Connection [com.mysql.jdbc.JDBC4Connection@7c29daf3]
Returned connection 2083117811 to pool. //用完了又放回连接池中
SqlSessionFactoryBuilder 创建出SqlSessionFactory,然后从SqlSessionFactory中得到SqlSession,最后通过SqlSession得到Mapper接口对象进行数据库操作。
我们打个断点.来跟踪SqlSessionFactoryBuilder的源代码:

F7跟进 发现一堆build 而我们现在用的是传入reader的那个方法

我们可以看到,他帮我们传了2个Null参数给下一个build,我们跟着这个build继续往下跟.

这个build会将xml解析.然后调用parser.parse()方法将xml转化成Configuration,传入下一个build
继续下一个build

这个build终于干了我们最关心的事,他创建了DefaultSqlSessionFactory 返回SqlSessionFactory.
我们进来看看这个类:
public class DefaultSqlSessionFactory implements SqlSessionFactory {
        //它是SqlSessionFactory的实现类.
  private final Configuration configuration;
        //通过传入一个Configuration 来构造
  public DefaultSqlSessionFactory(Configuration configuration) {
    this.configuration = configuration;
  }
  ...
这样一看,那我们直接给它来个configuration不就可以创建一个SqlSessionFactory吗.
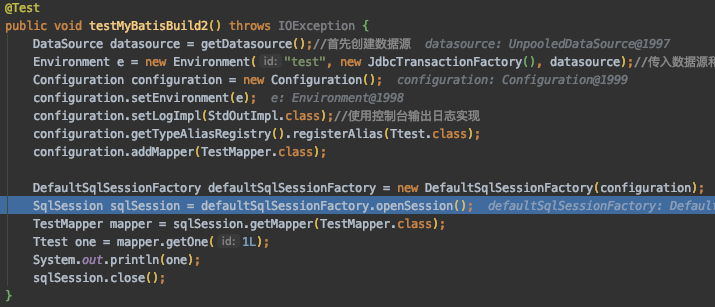
我们来试试
 //使用传入Configuration方式创建SqlSessionFactoryBuilder
    @Test
    public void testMyBatisBuild1() throws IOException {
        DataSource datasource = getDatasource();//首先创建数据源
        Environment e = new Environment("test", new JdbcTransactionFactory(), datasource);//传入datasource和JdbcTransactionFactory
        Configuration configuration = new Configuration();//构建一个Configuration
        configuration.setEnvironment(e);
        configuration.setLogImpl(StdOutImpl.class);//使用控制台输出日志实现
        configuration.getTypeAliasRegistry().registerAlias(Ttest.class);
        configuration.addMapper(TestMapper.class);
        //传入configuration
        SqlSessionFactory build = new SqlSessionFactoryBuilder().build(configuration);
        SqlSession sqlSession = build.openSession();
        TestMapper mapper = sqlSession.getMapper(TestMapper.class);
        Ttest one = mapper.getOne(1L);
        System.out.println(one);
        sqlSession.close();
    }
    //获取数据源方法
    public UnpooledDataSource getDatasource(){
        UnpooledDataSource unpooledDataSource = new UnpooledDataSource();
        unpooledDataSource.setUrl("jdbc:mysql://localhost:3306/test?characterEncoding=UTF-8");
        unpooledDataSource.setDriver("com.mysql.jdbc.Driver");
        unpooledDataSource.setUsername("root");
        unpooledDataSource.setPassword("123456");
        return unpooledDataSource;
    }
运行结果:
Logging initialized using 'class org.apache.ibatis.logging.stdout.StdOutImpl' adapter.
Opening JDBC Connection
Setting autocommit to false on JDBC Connection [com.mysql.jdbc.JDBC4Connection@3dd4520b]
==>  Preparing: select * from t_test where id = ?
==> Parameters: 1(Long)
<==    Columns: id, context
<==        Row: 1, 123


<==      Total: 1
Ttest{id=1, context='123'}
Resetting autocommit to true on JDBC Connection [com.mysql.jdbc.JDBC4Connection@3dd4520b]
Closing JDBC Connection [com.mysql.jdbc.JDBC4Connection@3dd4520b]
SqlSessionFactory factory = new SqlSessionFactoryBuilder().build(configuration);
//在构造SqlSessionFactory时实际调用的还是DefaultSqlSessionFactory 所以我们直接使用
DefaultSqlSessionFactory factory = new DefaultSqlSessionFactory(configuration);
//也是一样的效果

那么他的内部是如何创建session的我们来看看源代码
根据断点我们到了factory.opensession()方法 F7进入方法

F8单步 发现调用了openSessionFromDataSource方法

三个参数.第一个参数是configuration.getDefaultExecutorType()
这个参数是Configuration类中定义的默认类型.
ExecutorType

package org.apache.ibatis.session;
  //还有其它 的类型 如下.
/**
 * @author Clinton Begin
 */
public enum ExecutorType {
  SIMPLE, REUSE, BATCH
}
大家可能对 ExecutorType 参数感到陌生。这个枚举类型定义了三个值:
ExecutorType.SIMPLE:该类型的执行器没有特别的行为。它为每个语句的执行创建一个新的预处理语句。
ExecutorType.REUSE:该类型的执行器会复用预处理语句。
ExecutorType.BATCH:该类型的执行器会批量执行所有更新语句,如果 SELECT 在多个更新中间执行,将在必要时将多条更新语句分隔开来,以方便理解。这里不再深入讨论
level
是称为 TransactionIsolationLevel,
事务隔离级别支持 JDBC 的五个隔离级别(NONE、READ_UNCOMMITTED、READ_COMMITTED、REPEATABLE_READ 和 SERIALIZABLE),并且与预期的行为一致。
autoCommit
向 autoCommit 可选参数传递 true 值即可开启自动提交功能
继续往下 进到openSessionFromDataSource方法
  private SqlSession openSessionFromDataSource(ExecutorType execType, TransactionIsolationLevel level, boolean autoCommit) {
    Transaction tx = null;
    try {
      final Environment environment = configuration.getEnvironment();
      final TransactionFactory transactionFactory = getTransactionFactoryFromEnvironment(environment);
      tx = transactionFactory.newTransaction(environment.getDataSource(), level, autoCommit);
      final Executor executor = configuration.newExecutor(tx, execType);
      return new DefaultSqlSession(configuration, executor, autoCommit);//返回DefaultSqlSession
    } catch (Exception e) {
      closeTransaction(tx); // may have fetched a connection so lets call close()
      throw ExceptionFactory.wrapException("Error opening session.  Cause: " + e, e);
    } finally {
      ErrorContext.instance().reset();
    }
  }
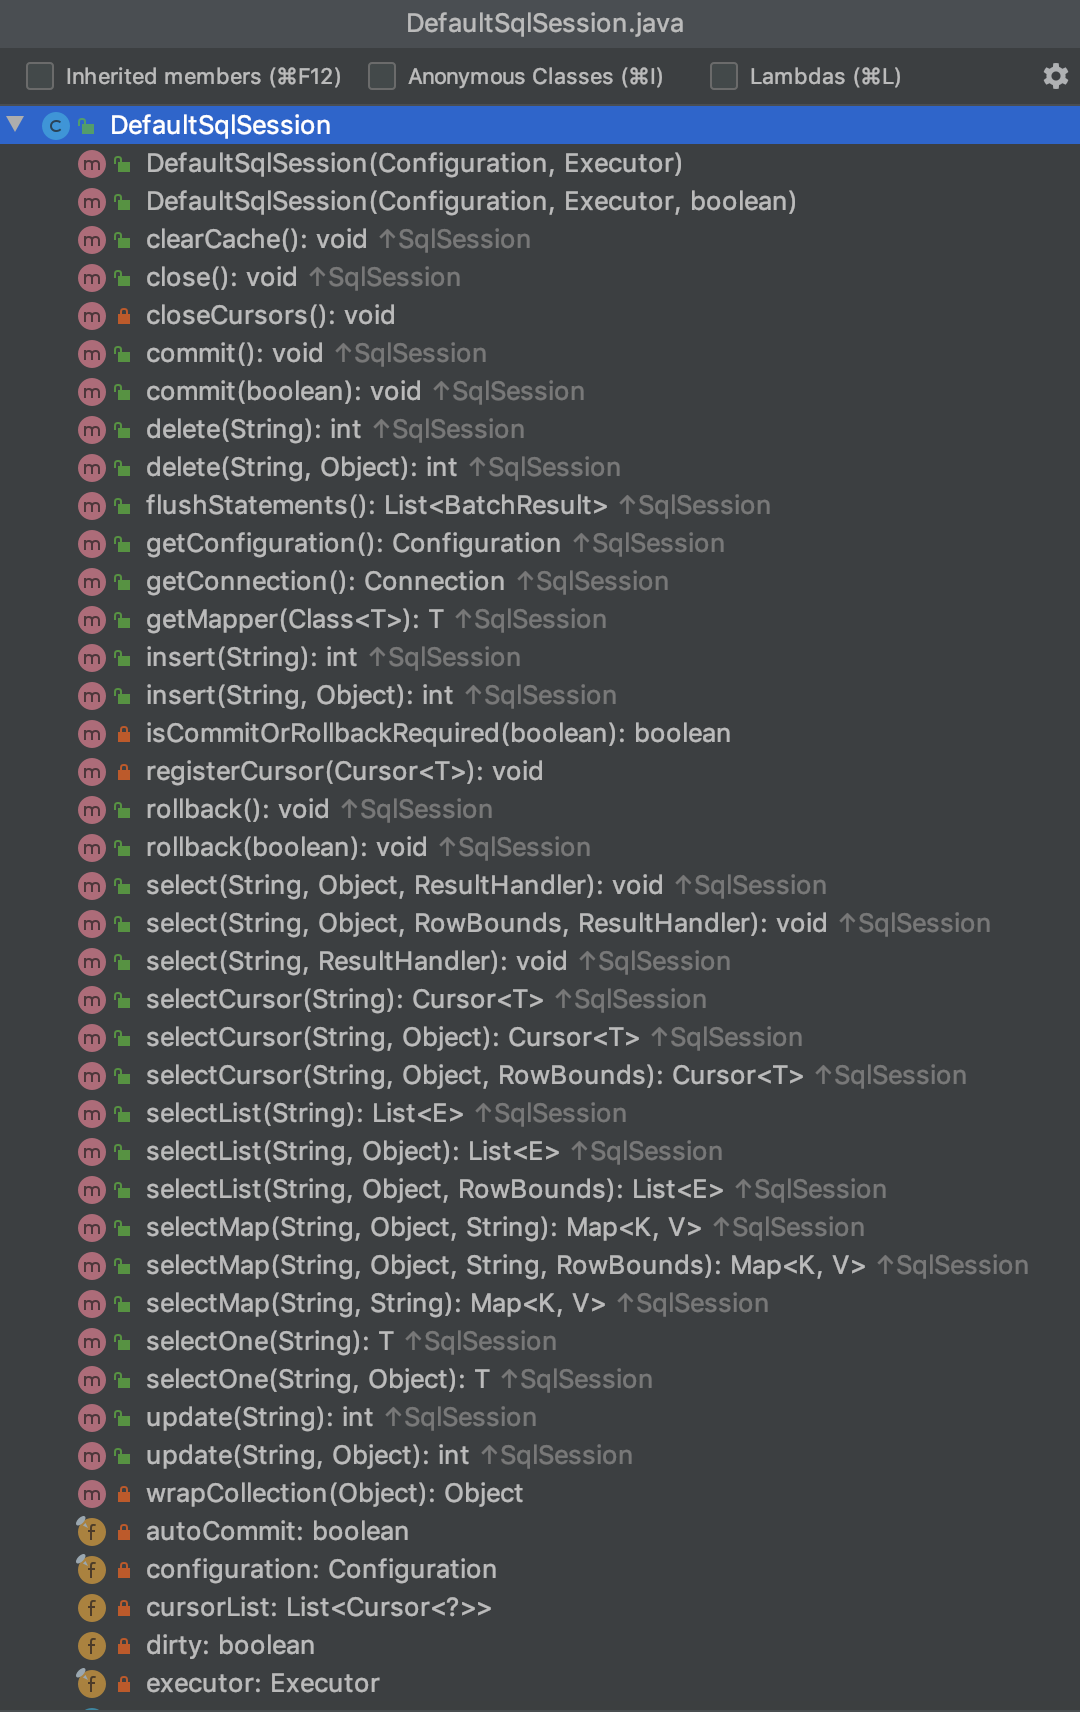
返回的DefaultSqlSession实现了SqlSession的所有方法

我们进入到Sqlsession类中查看一下实现它的都有哪些类

一共有两个,而且SqlSessionManager还实现了SqlSessionFactory
SqlSessionManager
public class SqlSessionManager implements SqlSessionFactory, SqlSession {

  private final SqlSessionFactory sqlSessionFactory;
  private final SqlSession sqlSessionProxy;//这里使用了代理,来增强sqlsession

  private final ThreadLocal<SqlSession> localSqlSession = new ThreadLocal<>();
  //使用Threadlocal管理本线程的sqlsession来复用sqlsession
  private SqlSessionManager(SqlSessionFactory sqlSessionFactory) {
    this.sqlSessionFactory = sqlSessionFactory;
    this.sqlSessionProxy = (SqlSession) Proxy.newProxyInstance(
        SqlSessionFactory.class.getClassLoader(),
        new Class[]{SqlSession.class},
        new SqlSessionInterceptor());
  }
  //这个方法帮我们直接创建了sqlSessionFactory并且将传入的sqlSessionFactory的SqlSession进行了代理
  public static SqlSessionManager newInstance(Reader reader) {
    return new SqlSessionManager(new SqlSessionFactoryBuilder().build(reader, null, null));
  }
  .....
   public static SqlSessionManager newInstance(Reader reader) {
    return new SqlSessionManager(new SqlSessionFactoryBuilder().build(reader, null, null));
  }

  public static SqlSessionManager newInstance(Reader reader, String environment) {
    return new SqlSessionManager(new SqlSessionFactoryBuilder().build(reader, environment, null));
  }

  public static SqlSessionManager newInstance(Reader reader, Properties properties) {
    return new SqlSessionManager(new SqlSessionFactoryBuilder().build(reader, null, properties));
  }

  public static SqlSessionManager newInstance(InputStream inputStream) {
    return new SqlSessionManager(new SqlSessionFactoryBuilder().build(inputStream, null, null));
  }

  public static SqlSessionManager newInstance(InputStream inputStream, String environment) {
    return new SqlSessionManager(new SqlSessionFactoryBuilder().build(inputStream, environment, null));
  }

  public static SqlSessionManager newInstance(InputStream inputStream, Properties properties) {
    return new SqlSessionManager(new SqlSessionFactoryBuilder().build(inputStream, null, properties));
  }

  public static SqlSessionManager newInstance(SqlSessionFactory sqlSessionFactory) {
    return new SqlSessionManager(sqlSessionFactory);
  }

  .....
   @Override
    public Object invoke(Object proxy, Method method, Object[] args) throws Throwable { //使用Threadlocal管理本线程的sqlsession来复用sqlsession
      final SqlSession sqlSession = SqlSessionManager.this.localSqlSession.get();
      if (sqlSession != null) {//获取本线程的sqlsession
        try {
          return method.invoke(sqlSession, args);//实际调用
        } catch (Throwable t) {
          throw ExceptionUtil.unwrapThrowable(t);
        }
      } else {
        try (SqlSession autoSqlSession = openSession()) {
          try {
            final Object result = method.invoke(autoSqlSession, args);
            autoSqlSession.commit();
            return result;
          } catch (Throwable t) {
            autoSqlSession.rollback();
            throw ExceptionUtil.unwrapThrowable(t);
          }
        }
      }
    }
SqlSessionManager
他实现了Session接口。意味着,SqlSessionManager集成了 sqlSessionFactory和session 的功能。通过SqlSessionManager,开发者可以不在理会SqlSessionFacotry的存在,直接面向Session编程。
SqlSessionManager 内部提供了一个sqlSessionProxy,这个sqlSessionProxy提供了所有Session接口的实现,而实现中正是使用了上面提到的本地线程保存的session实例。
这样,在同一个线程实现不同的sql操作,可以复用本地线程session,避免了DefaultSqlSessionFactory实现的每一个sql操作都要创建新的session实例
下面让我们用一个简单的实例来试试
@Test
    public void testMyBatisBuild3() throws IOException {
        Reader reader = Resources.getResourceAsReader("mybatis-config.xml");
// SqlSessionFactory build = new SqlSessionFactoryBuilder().build(reader);
// 不使用SqlSessionFactory 使用SqlSessionManager.newInstance();
        SqlSessionManager sqlSessionManager = SqlSessionManager.newInstance(reader);
        SqlSession sqlSession = sqlSessionManager.openSession();
        TestMapper mapper = sqlSession.getMapper(TestMapper.class);
        Ttest one = mapper.getOne(1L);
        System.out.println(one);
        sqlSession.close();
    }
运行结果:
Reader entry: ����1	getOne0(Ljava/lang/Long;)Lcom/liangtengyu/entity/Ttest;
Find JAR URL: file:/Users/tengyu/IdeaProjects/mybatis-study/target/classes/com/liangtengyu/mapper/TestMapper.xml
Not a JAR: file:/Users/tengyu/IdeaProjects/mybatis-study/target/classes/com/liangtengyu/mapper/TestMapper.xml
Reader entry: <?xml version="1.0" encoding="UTF-8"?>
Checking to see if class com.liangtengyu.mapper.TestMapper matches criteria [is assignable to Object]
Opening JDBC Connection
Created connection 1585787493.
Setting autocommit to false on JDBC Connection [com.mysql.jdbc.JDBC4Connection@5e853265]
==>  Preparing: select * from t_test where id = ?
==> Parameters: 1(Long)
<==    Columns: id, context
<==        Row: 1, 123


<==      Total: 1
Ttest{id=1, context='123'}
Resetting autocommit to true on JDBC Connection [com.mysql.jdbc.JDBC4Connection@5e853265]
Closing JDBC Connection [com.mysql.jdbc.JDBC4Connection@5e853265]
Returned connection 1585787493 to pool.
本章主要讲了MyBatis构建SqlSessionFactory方式,过程,和sqlsession的创建,以及使用SqlSessionManager管理session复用的实现方式.
下一篇研究数据源的池化和数据源加载过程.
加群一起学习吧
关注公众号:java宝典
所属网站分类: 技术文章 > 博客
作者:abcjava
链接:http://www.javaheidong.com/blog/article/13605/0dbcac8e0fd299bf4051/
来源:java黑洞网
任何形式的转载都请注明出处,如有侵权 一经发现 必将追究其法律责任
昵称:
评论内容:(最多支持255个字符)
---无人问津也好,技不如人也罢,你都要试着安静下来,去做自己该做的事,而不是让内心的烦躁、焦虑,坏掉你本来就不多的热情和定力

