centos7装jdk、nginx、redis、业务系统部署
发布于2021-05-29 19:26 阅读(1289) 评论(0) 点赞(15) 收藏(4)
1.安装jdk
(1)下载安装包
官网下载地址:https://www.oracle.com/java/technologies/javase/javase-jdk8-downloads.html
(2)检查服务器是否安装了openjdk,如果有,则卸载
rpm -qa | grep java
rpm -e xxx
(3)rpm -ivh jdk-8u251-linux-x64.rpm
(4)vim /etc/profile配置环境变量
export JAVA_HOME=/usr/java/jdk1.8.0_271-amd64
export CLASSPATH=.:$JAVA_HOME/jre/lib/rt.jar:$JAVA_HOME/lib/dt.jar:$JAVA_HOME/lib/tools.jar
export PATH=$PATH:$JAVA_HOME/bin
(5)执行生效命令:source /etc/profile
(6)最后执行java -version验证
2.使用源码编译安装nignx,包括具体的编译参数信息
参看Nginx安装文档
Nginx是一款高性能的 Web和 反向代理 服务器,也是一个 IMAP/POP3/SMTP 代理服务器。在高连接并发的情况下,Nginx是Apache服务器不错的替代品。
2.1 安装编译工具及库文件
1.安装make、gcc
yum -y install gcc automake autoconf libtool make
yum install gcc gcc-c++
2.安装PCRE pcre-devel
Nginx的Rewrite模块和HTTP核心模块会使用到PCRE正则表达式语法。这里需要安装两个安装包pcre和pcre-devel。第一个安装包提供编译版本的库,而第二个提供开发阶段的头文件和编译项目的源代码。安装指令如下:
yum install -y pcre pcre-devel
3.zlib库提供了开发人员的压缩算法,在Nginx的各种模块中需要使用gzip压缩。安装指令如下:
yum install -y zlib zlib-devel
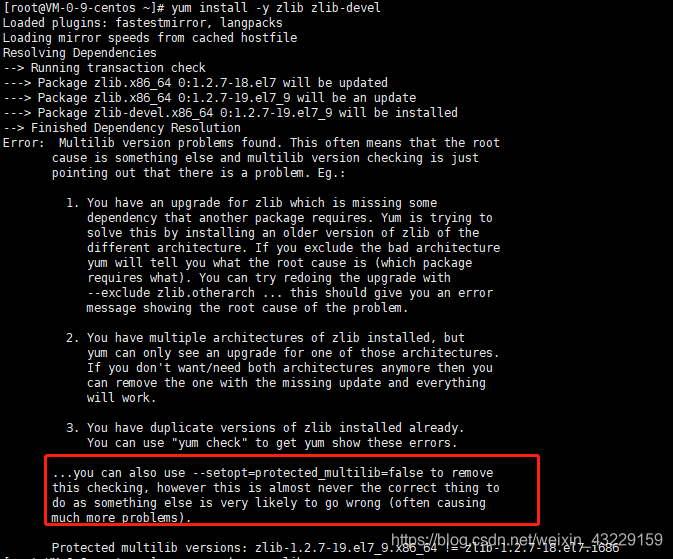
可能会有报错信息如下:

使用如下命令正常安装:
yum install -y zlib zlib-devel --setopt=protected_multilib=false
4.安装Open SSL
nginx不仅支持 http协议,还支持 https(即在 ssl 协议上传输 http),如果使用了 https,需要安装 OpenSSL 库。安装指令如下:
yum install -y openssl openssl-devel
或如图下载编译或安装:

2.2 安装nginx并安装
1.下载nginx-1.9.9.tar.gz,上传到/usr/local目录下
2.解压
cd /usr/local
tar -zvxf nginx-1.9.9.tar.gz
3.nginx编译选项
(1)configure命令是用来检测你的安装平台的目标特征的。它定义了系统的各个方面,包括nginx的被允许使用的连接处理的方法,比如它会检测你是不是有CC或GCC,并不是需要CC或GCC,它是个shell脚本,执行结束时,它会创建一个Makefile文件。
(2)make是用来编译的,它从Makefile中读取指令,然后编译。
(3)make install是用来安装的,它也从Makefile中读取指令,安装到指定的位置。
4.安装nginx
cd /usr/local/nginx-1.9.9
./configure
make
make install

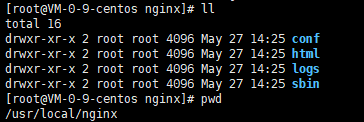
5.安装成功后 /usr/local/nginx 目录下如下:

6.启动
确保系统的 80 端口没被其他程序占用,运行/usr/local/nginx/nginx 命令来启动 Nginx

7.-bash: nginx: command not found—>配置环境变量,vim /etc/profile 增加如下内容,然后执行生效命令:source /etc/profile
export NGINX_HOME=/usr/local/nginx
export PATH=$PATH:$NGINX_HOME/sbin

#启动
nginx
#重新载入配置文件
nginx -s reload
#重启Nginx
nginx -s reopen
#停止Nginx
nginx -s stop
8.打开浏览器访问此机器的 IP,如果浏览器出现 Welcome to nginx! 则表示 Nginx 已经安装并运行成功。

三.安装redis
1.安装gcc依赖
由于 redis 是用 C 语言开发,安装之前必先确认是否安装 gcc 环境(gcc -v)
2.下载并解压安装包redis-6.0.9.tar.gz
cd /usr/local
tar -zxvf redis-6.0.9.tar.gz
#切换到redis解压目录下执行编译
cd redis-6.0.9
make
make install
3.执行make报如下图错,原因是因为gcc版本过低,yum安装的gcc是4.8.5的。因此需要升级gcc

[root@VM-0-9-centos redis-6.0.9]# gcc -v                             # 查看gcc版本
[root@VM-0-9-centos redis-6.0.9]# yum -y install centos-release-scl  # 升级到9.1版本
[root@VM-0-9-centos redis-6.0.9]# yum -y install devtoolset-9-gcc devtoolset-9-gcc-c++ devtoolset-9-binutils
[root@VM-0-9-centos redis-6.0.9]# scl enable devtoolset-9 bash
以上为临时启用,如果要长期使用gcc 9.1的话:
[root@VM-0-9-centos redis-6.0.9]# echo "source /opt/rh/devtoolset-9/enable" >>/etc/profile
4.再执行make,成功

5.启动redis,Ctrl+C 杀死redis进程,执行相关配置
cd /usr/local/redis-6.0.9/src
./redis-server

6.配置redis.conf,vim redis.conf,增加或修改以下配置:
daemonize yes #后台启动
由于redis需要供其他服务器访问注释掉bind的IP
#bind 127.0.0.1
7.再次启动
./redis-server /usr/local/redis-6.0.9/redis.conf

8.设置开机启动
(1)vim /etc/systemd/system/redis.service
输入以下内容:
[Unit]
Description=redis-server
After=network.target

[Service]
Type=forking
ExecStart=/usr/local/redis-6.0.9/src/redis-server /usr/local/redis-6.0.9/redis.conf
PrivateTmp=true

[Install]
WantedBy=multi-user.target
(2)
systemctl daemon-reload
systemctl enable redis.service
#启动redis服务
systemctl start redis.service
9.创建redis软链
ln -s /usr/local/redis-6.0.9/src/redis-cli /usr/bin/
以后就可以在任意路径使用redis-cli来调用redis-cli了
10.redis服务常用命令
systemctl start redis.service     #启动redis服务
systemctl stop redis.service      #停止redis服务
systemctl restart redis.service   #重新启动服务
systemctl status redis.service    #查看服务当前状态
systemctl enable redis.service    #设置开机自启动
systemctl disable redis.service   #停止开机自启动
四.业务系统部署

1.修改nginx.conf
worker_processes 1; #设置值和CPU核心数一致
error_log  logs/error.log;
error_log  logs/error.log  notice;
error_log  logs/error.log  info;

#pid  logs/nginx.pid;

#Specifies the value for maximum file descriptors that can be opened by this process.
worker_rlimit_nofile 65535;
events
{
  use epoll;
  worker_connections 65535;
}
http
{
  include mime.types;
  default_type application/octet-stream;
  log_format main  '$remote_addr - $remote_user [$time_local] "$request" '
               '$status $body_bytes_sent "$http_referer" '
               '"$http_user_agent" $http_x_forwarded_for';

  charset utf-8;

  server_names_hash_bucket_size 128;
  client_header_buffer_size 32k;
  large_client_header_buffers 4 32k;
  client_max_body_size 8m;

  sendfile on;
  tcp_nopush on;
  keepalive_timeout 60;
  tcp_nodelay on;
  fastcgi_connect_timeout 300;
  fastcgi_send_timeout 300;
  fastcgi_read_timeout 300;
  fastcgi_buffer_size 64k;
  fastcgi_buffers 4 64k;
  fastcgi_busy_buffers_size 128k;
  fastcgi_temp_file_write_size 128k;
  gzip on;
  gzip_min_length 1k;
  gzip_buffers 4 16k;
  gzip_http_version 1.0;
  gzip_comp_level 2;
  gzip_types text/plain application/x-javascript text/css application/xml;
  gzip_vary on;

  #下面是server虚拟主机的配置
  include vhost/*.conf;
}

vue-html-web.conf如下:
server {
	listen       8081;
	server_name  127.0.0.1;

	add_header X-Frame-Options "SAMEORIGIN" always;
	add_header X-XSS-Protection "1; mode=block" always;
	add_header X-Content-Type-Options "nosniff" always;
	add_header Referrer-Policy "no-referrer-when-downgrade" always;
	add_header Content-Security-Policy "default-src * data: 'unsafe-eval' 'unsafe-inline' blob: 'unsafe-eval' 'unsafe-inline'" always;

	access_log  logs/host.access.log  main;

	#智慧信访平台前端html
	location / {
		root   /home/ywxt/zhxf_web;
		index  index.html index.htm;
	}

	#智慧信访平台
	location /api/ {
		proxy_pass http://127.0.0.1:9930/;
		client_max_body_size 100M;
		proxy_set_header X-Real-IP $remote_addr;
		proxy_set_header X-Forwarded-For $proxy_add_x_forwarded_for;
		proxy_read_timeout  3600;
	}

	#文件地址
	location /letters {
		alias /home/sdnas/ywxtnas;
		allow all;
		charset utf-8;
	}

	# 智能工具地址
	location /zhxfai/ {
		proxy_pass http://172.16.60.14:6001/api/; #后端ip地址
		proxy_redirect off; #关闭后端返回的header修改
		proxy_set_header Host $host; #修改发送到后端的header的host
		proxy_set_header X-Real-IP $remote_addr; #设置真实ip
		proxy_set_header X-Forwarded-For $proxy_add_x_forwarded_for;
	}

	# 报表服务
	location /tjfx/ {
		proxy_pass http://10.210.36.10:8081/tjfx/;
		proxy_redirect off; #关闭后端返回的header修改
		proxy_set_header Host $host; #修改发送到后端的header的host
		proxy_set_header X-Real-IP $remote_addr; #设置真实ip
		proxy_set_header X-Forwarded-For $proxy_add_x_forwarded_for;
	}

	# 错误页面
	error_page 400 403 404 500 502 503 504 /error.html;
}
2.启动restart.sh,项目启动不起来,云服务器1G内存耗尽
原文链接:https://blog.csdn.net/weixin_43229159/article/details/106842648
所属网站分类: 技术文章 > 博客
作者:飞向远方
链接:http://www.javaheidong.com/blog/article/207129/1374664d61617e6a2f24/
来源:java黑洞网
任何形式的转载都请注明出处,如有侵权 一经发现 必将追究其法律责任
昵称:
评论内容:(最多支持255个字符)
---无人问津也好,技不如人也罢,你都要试着安静下来,去做自己该做的事,而不是让内心的烦躁、焦虑,坏掉你本来就不多的热情和定力